Oceanology Legacy - Navigation
Control buoyant vessels with keyboard, mouse, or gamepad using the Pawn-based navigation system.
Prerequisites
| Requirement | Details |
|---|---|
| Engine | UE5.x (latest release) |
| Plugin | Oceanology Legacy installed and configured |
| Scene | Water body with buoyancy setup |
| Skills | Basic familiarity with Pawns and Enhanced Input |
The navigation system uses a Pawn-based architecture where players control a lightweight Pawn following a physics-simulated buoyant mesh. This separation keeps input handling clean while allowing realistic wave-based movement.
Step-by-step
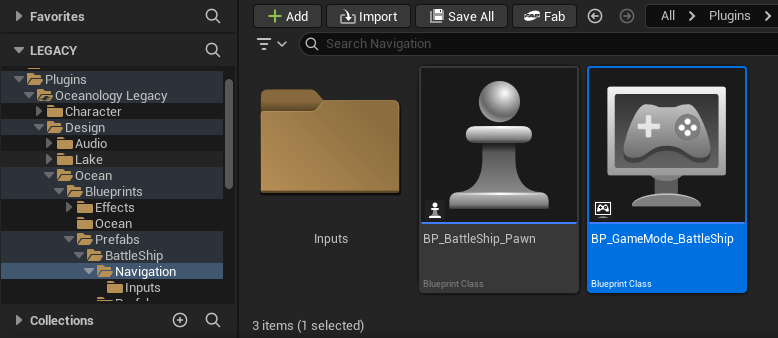
Open the Content Browser and navigate to:
Plugins > Oceanology Legacy > Design > Ocean > Prefabs > BattleShip > Navigation
This folder contains all the navigation-related assets:
- Inputs - A subfolder containing the Enhanced Input assets (Input Actions and Input Mapping Contexts).
- BP_BattleShip_Pawn - The player-controllable Pawn Blueprint that handles input and follows the buoyant ship mesh.
- BP_GameMode_BattleShip - A Game Mode Blueprint pre-configured to spawn the BattleShip Pawn as the default player character.
These assets work together to provide a complete ship navigation system out of the box.
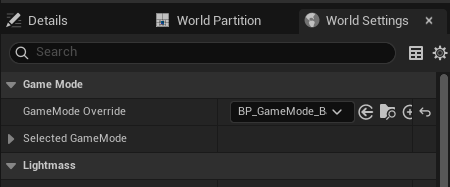
To enable ship navigation in your level, you need to override the default Game Mode.
Open World Settings (Window > World Settings or click the Settings button in the toolbar and select World Settings). In the Game Mode section, locate the GameMode Override dropdown.
Click the dropdown and select BP_GameMode_BattleShip. This tells Unreal Engine to use the BattleShip navigation system when playing this level.
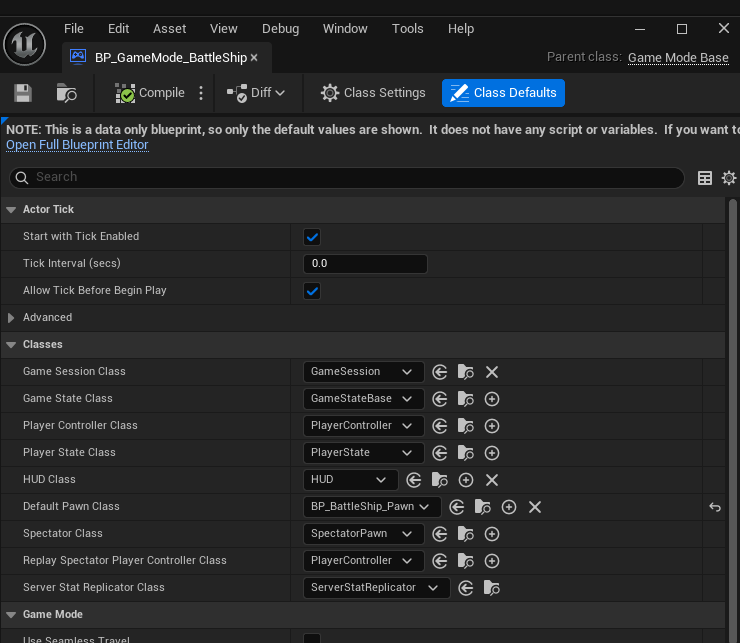
To understand how the Game Mode is configured, open BP_GameMode_BattleShip in the Blueprint Editor. Since this is a data-only Blueprint, click Class Defaults in the toolbar to view its settings.
Key Settings:
| Property | Value | Purpose |
|---|---|---|
| Default Pawn Class | BP_BattleShip_Pawn | The Pawn spawned for each player |
| Player Controller Class | PlayerController | Standard player controller |
| HUD Class | HUD | Default HUD (customize as needed) |
| Game Session Class | GameSession | Standard session handling |
| Game State Class | GameStateBase | Standard game state |
| Player State Class | PlayerState | Standard player state |
The most important setting is Default Pawn Class. This determines what actor the player controls when the game starts. By setting it to BP_BattleShip_Pawn, players will automatically possess the ship navigation Pawn.
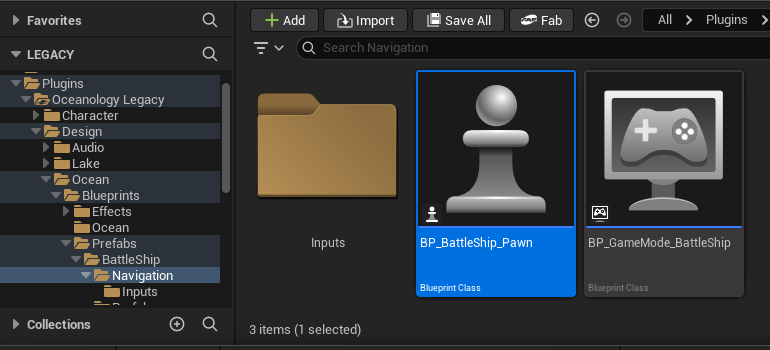
Understanding the BattleShip Pawn
The BP_BattleShip_Pawn is the core of the navigation system. It handles player input and synchronizes with a physics-simulated buoyant ship mesh.
In the Content Browser, navigate to the Navigation folder and select BP_BattleShip_Pawn. This Blueprint Class contains all the logic for ship navigation.
Double-click to open it in the Blueprint Editor to examine its structure and logic.
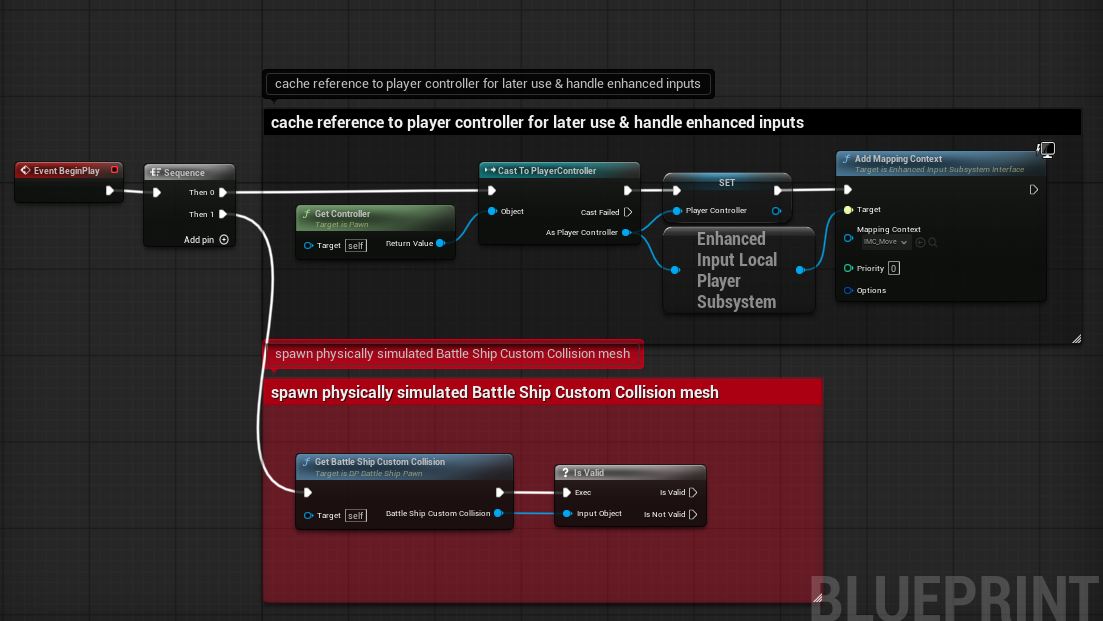
Open the Event Graph of BP_BattleShip_Pawn. The Event BeginPlay node initializes the navigation system with two main tasks:
Section 1: Cache reference to player controller for later use & handle enhanced inputs This section:
- Gets the Player Controller using
Get Controllerand casts it toPlayerController. - Stores the reference in a
Player Controllervariable for later use. - Accesses the Enhanced Input Local Player Subsystem to register input mappings.
- Calls
Add Mapping Contextto activate theIMC_MoveInput Mapping Context with Priority 0.
Section 2: Spawn physically simulated Battle Ship Custom Collision mesh This section:
- Calls
Get Battle Ship Custom Collisionto retrieve a reference to the buoyant ship mesh. - Uses
Is Validto verify the reference exists before proceeding.
The separation of Pawn and buoyant mesh is intentional - the Pawn handles input while the physics-simulated mesh handles realistic water interaction.
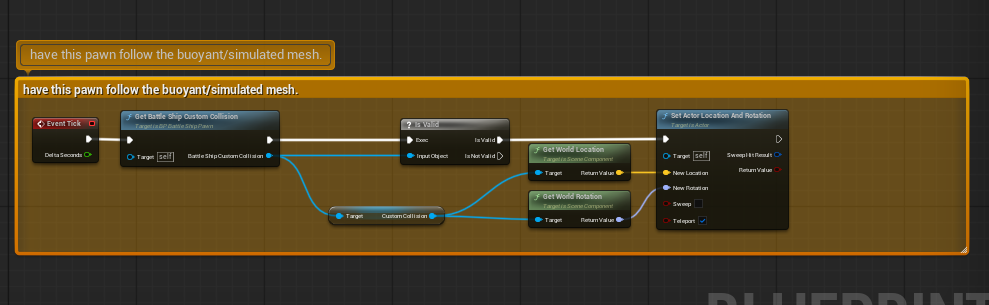
The Event Tick section keeps the Pawn synchronized with the buoyant ship mesh every frame.
Section: Have this pawn follow the buoyant/simulated mesh This logic:
- Gets the
Battle Ship Custom Collisionreference. - Validates it with
Is Valid. - Retrieves the world location and rotation of the
Custom Collisioncomponent. - Calls
Set Actor Location And Rotationon the Pawn (self) with:- New Location - The buoyant mesh's world location.
- New Rotation - The buoyant mesh's world rotation.
- Sweep - Disabled (direct teleport).
- Teleport - Enabled (no physics interpolation).
This approach ensures the player's viewpoint follows the ship's movement while the physics simulation runs independently on the buoyant mesh.
Input Handling
The navigation system uses Unreal Engine's Enhanced Input System for flexible, rebindable controls.
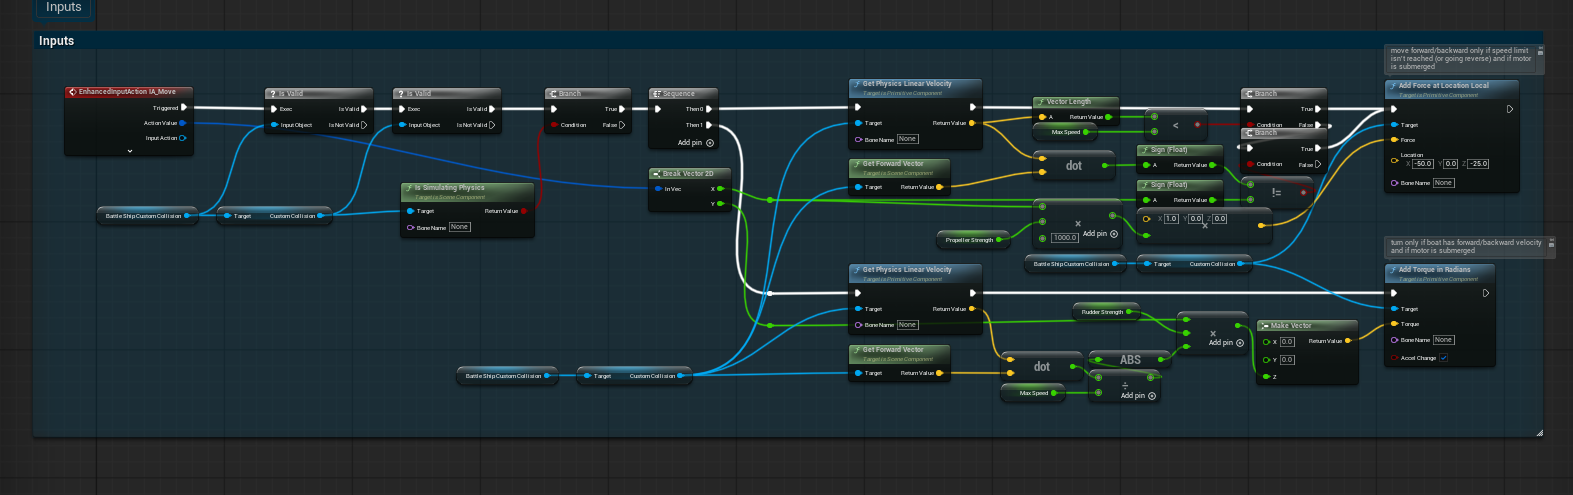
The input handling section processes the IA_Move Input Action to control ship movement.
EnhancedInputAction IA_Move triggers when the player provides movement input. The logic flow:
-
Validation Chain - Multiple
Is Validchecks ensure all required references exist (Battle Ship Custom Collision, physics simulation state). -
Is Simulating Physics - Verifies the buoyant mesh is actively simulating physics before applying forces.
-
Propulsion System:
Get Physics Linear Velocityretrieves current ship speed.Vector Lengthcalculates the speed magnitude.- Compares against
Max Speedto enforce speed limits. Get Forward Vectordetermines the ship's forward direction.Add Force at Location Localapplies thrust force based onPropeller Strength(default: 1000.0).- Force is applied only when below max speed and with valid forward/backward input.
-
Rudder System:
Get Physics Linear Velocitychecks if the ship is moving (rudder only works when in motion).Get Forward Vectoranddotproduct determine movement direction.Add Torque in Radiansapplies rotational force based onRudder Strength.- Torque is scaled by the horizontal input axis (A/D keys or left thumbstick).
The comments in the Blueprint explain key conditions: "move forward/backward only if speed limit isn't reached (or going reverse) and if motor is submerged" and "turn only if boat has forward/backward velocity and if motor is submerged."
Enhanced Input Assets
The Input Actions and Input Mapping Contexts define how player input translates to ship movement.
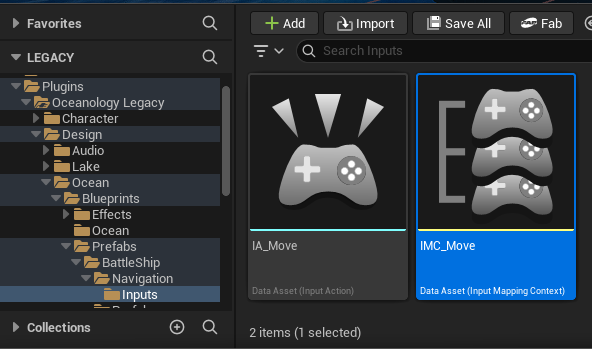
In the Content Browser, navigate to:
Plugins > Oceanology Legacy > Design > Ocean > Prefabs > BattleShip > Navigation > Inputs
This folder contains:
- IA_Move - An Input Action that captures 2D movement input (forward/backward and left/right).
- IMC_Move - An Input Mapping Context that binds keyboard keys and gamepad controls to the IA_Move action.
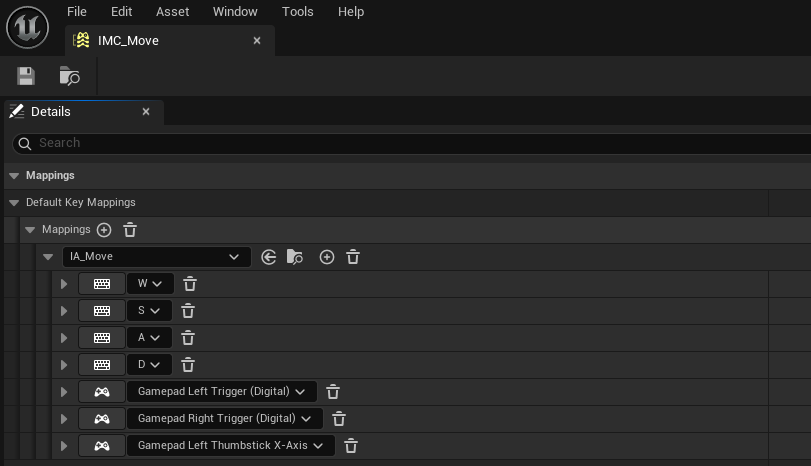
Open IMC_Move to see the default key bindings. In the Mappings section, you will find:
Keyboard Mappings:
| Key | Function |
|---|---|
| W | Forward (positive Y axis) |
| S | Backward (negative Y axis) |
| A | Turn Left (negative X axis) |
| D | Turn Right (positive X axis) |
Gamepad Mappings:
| Input | Function |
|---|---|
| Left Trigger (Digital) | Backward |
| Right Trigger (Digital) | Forward |
| Left Thumbstick X-Axis | Turn Left/Right |
You can add or modify mappings to support additional input devices or customize the control scheme for your game.
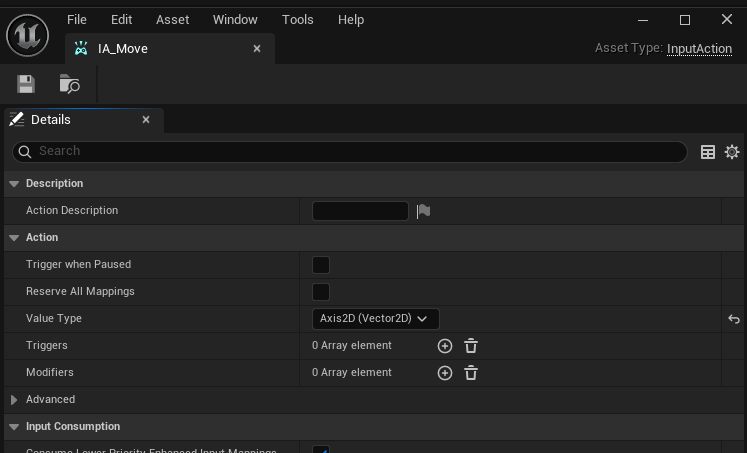
Open IA_Move to see its configuration:
Key Settings:
| Property | Value | Purpose |
|---|---|---|
| Value Type | Axis2D (Vector2D) | Captures both horizontal (X) and vertical (Y) input simultaneously |
| Triggers | 0 Array element | No special triggers (fires continuously while held) |
| Modifiers | 0 Array element | No input modifiers applied |
| Trigger when Paused | Disabled | Input ignored when game is paused |
| Reserve All Mappings | Disabled | Allows input to propagate to other actions |
The Axis2D value type is essential for ship navigation because it captures both forward/backward (Y axis) and turning (X axis) input as a single Vector2D value. This allows the Blueprint to process both movement dimensions in one Input Action event.
Relationship with Buoyancy Prefabs
The navigation system is designed to work with the BattleShip buoyancy prefabs. Understanding this relationship helps when creating custom vessels.
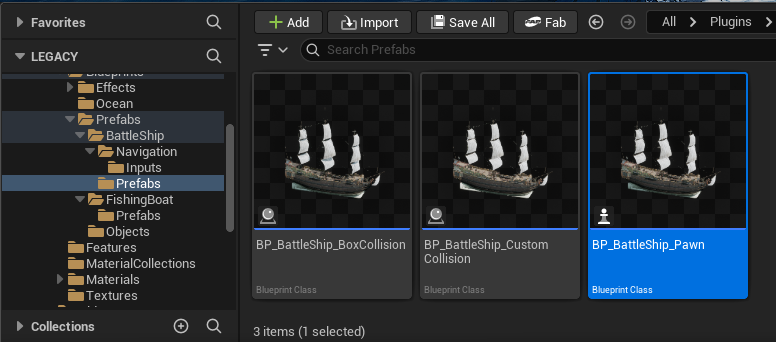
In the Content Browser, navigate to:
Plugins > Oceanology Legacy > Design > Ocean > Prefabs > BattleShip > Prefabs
Here you will find three BattleShip variants:
| Prefab | Purpose | Navigation Compatible |
|---|---|---|
| BP_BattleShip_BoxCollision | Simple box collision for buoyancy | �⚠️ Requires modification |
| BP_BattleShip_CustomCollision | Hull-conforming collision mesh | ✅ Yes (referenced by Pawn) |
| BP_BattleShip_Pawn | Player-controlled navigation Pawn | ✅ Yes (this is the controller) |
The BP_BattleShip_Pawn references and follows the BP_BattleShip_CustomCollision prefab. When the game starts, the Pawn spawns and locates the CustomCollision ship in the level to synchronize with its physics simulation.
Important: For navigation to work, you must have a BP_BattleShip_CustomCollision actor placed in your level. The Pawn will automatically find and follow it.
Configuration Summary
The following table summarizes the key components of the navigation system:
| Component | Location | Purpose |
|---|---|---|
| BP_GameMode_BattleShip | Navigation folder | Sets BP_BattleShip_Pawn as Default Pawn Class |
| BP_BattleShip_Pawn | Navigation folder | Handles input and follows buoyant mesh |
| IMC_Move | Navigation > Inputs | Maps keys/buttons to IA_Move action |
| IA_Move | Navigation > Inputs | Captures 2D movement input (Axis2D) |
| BP_BattleShip_CustomCollision | Prefabs folder | Physics-simulated buoyant ship mesh |
Key Principles:
- The Game Mode determines which Pawn class players control.
- The Pawn handles input but does not simulate physics directly.
- The buoyant mesh (CustomCollision) handles all physics simulation.
- The Pawn follows the buoyant mesh every tick, keeping input and physics separated.
- Enhanced Input provides flexible, rebindable controls for keyboard and gamepad.
Navigation Parameters
The BP_BattleShip_Pawn exposes several parameters for tuning ship handling:
| Parameter | Default Value | Description |
|---|---|---|
| Propeller Strength | 1000.0 | Force applied when accelerating forward/backward |
| Rudder Strength | Variable | Torque applied when turning left/right |
| Max Speed | Variable | Maximum linear velocity before thrust is disabled |
Tuning Tips:
- Increase Propeller Strength for faster acceleration (larger ships may need higher values).
- Increase Rudder Strength for tighter turns (be careful not to make it feel unrealistic).
- Adjust Max Speed to balance gameplay feel with realism.
- These values interact with the Mass and Damping settings on the buoyant mesh - tune them together for best results.
Troubleshooting Common Issues
| Problem | Likely Cause | Solution |
|---|---|---|
| Ship doesn't move at all | Game Mode not set | Set GameMode Override to BP_GameMode_BattleShip in World Settings |
| Ship doesn't respond to input | Input Mapping Context not added | Verify Add Mapping Context is called in BeginPlay |
| Pawn spawns but doesn't follow ship | CustomCollision ship not in level | Place BP_BattleShip_CustomCollision in your level |
| Ship moves but camera doesn't follow | Camera not attached to Pawn | Add a Camera component to BP_BattleShip_Pawn |
| Controls feel sluggish | Damping too high on buoyant mesh | Reduce Linear/Angular Damping on the CustomCollision component |
| Ship spins uncontrollably | Rudder Strength too high | Reduce Rudder Strength or increase Angular Damping |
| Ship accelerates infinitely | Max Speed not enforced | Verify the speed check logic in the movement Blueprint |
| Gamepad not working | Missing gamepad mappings | Add gamepad bindings to IMC_Move |
Summary
In this guide, you learned how to:
- Locate the Navigation assets - Find the Game Mode, Pawn, and Input assets in the BattleShip > Navigation folder.
- Configure the Game Mode - Set the GameMode Override in World Settings to enable ship navigation.
- Understand the Pawn architecture - Learn how the Pawn follows a physics-simulated buoyant mesh for realistic wave response.
- Examine the input logic - Understand how Enhanced Input drives propulsion and rudder controls.
- Configure Input Mappings - Review and customize keyboard and gamepad bindings in IMC_Move.
- Understand the Input Action - Learn why Axis2D is used for combined movement input.
- Connect Navigation with Buoyancy - Understand the relationship between the Pawn and the CustomCollision buoyant mesh.
With this knowledge, you can customize the navigation system for your own vessels or create entirely new player-controlled boats and ships.