Oceanology Legacy - RVT Heightmap
Enable realistic water-terrain interaction with dynamic shoreline foam, depth effects, and wave masking.
Overview
RVT Heightmap enables realistic water-terrain interaction by reading landscape height data through Unreal Engine's Runtime Virtual Texture system. The ocean dynamically generates effects where water meets land.
| Effect | Description |
|---|---|
| Shoreline Foam | White foam appears where waves touch the beach |
| Depth Transparency | Water becomes clearer in shallow areas |
| Wave Masking | Waves naturally flatten near the shore |
| Still Shore Areas | Calm water in very shallow regions |
How RVT Heightmap Works
- Landscape writes height - Your landscape material outputs world height to a Runtime Virtual Texture
- Ocean reads height - The ocean material samples this texture to know terrain position
- Effects are calculated - Based on the height difference between water surface and terrain, the ocean generates foam, adjusts transparency, and modifies wave behavior.
This GPU-based approach is highly performant and works with any landscape shape, including complex coastlines, islands, and underwater terrain.
Prerequisites
- Unreal Engine 5.6 or newer.
- Oceanology Legacy installed and configured.
- A Landscape actor in your level (the terrain that will interact with water).
- Basic familiarity with Materials and Runtime Virtual Textures in Unreal Engine.
Notes
- RVT Heightmap requires your landscape material to output height data to a Runtime Virtual Texture. Oceanology provides a ready-to-use material for this purpose.
- The system works with both Landscape actors and custom Ground Meshes.
- Performance impact is minimal as all calculations happen on the GPU using virtual texture sampling.
- This feature is essential for realistic coastal scenes and should be configured for any project featuring shorelines.
Step-by-step
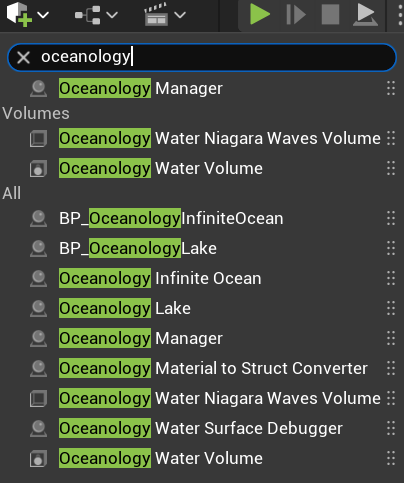
Open your level and use the Quickly Add to the Project menu (the + button in the toolbar or right-click in the viewport). Search for oceanology to filter the available actors.
You will need to drag the following actors into your scene:
- Oceanology Manager - The central controller that manages all Oceanology systems, including RVT Heightmap configuration.
- Oceanology Water Niagara Waves Volume - Optional volume for Niagara-based wave effects.
- Oceanology Water Volume - Defines the region where water interactions occur.
- BP_OceanologyInfiniteOcean - The infinite ocean water body.
- BP_OceanologyLake (optional) - A bounded lake water body.
For RVT Heightmap, the critical actors are Oceanology Manager (which contains the heightmap configuration) and BP_OceanologyInfiniteOcean (which contains the RVT settings).
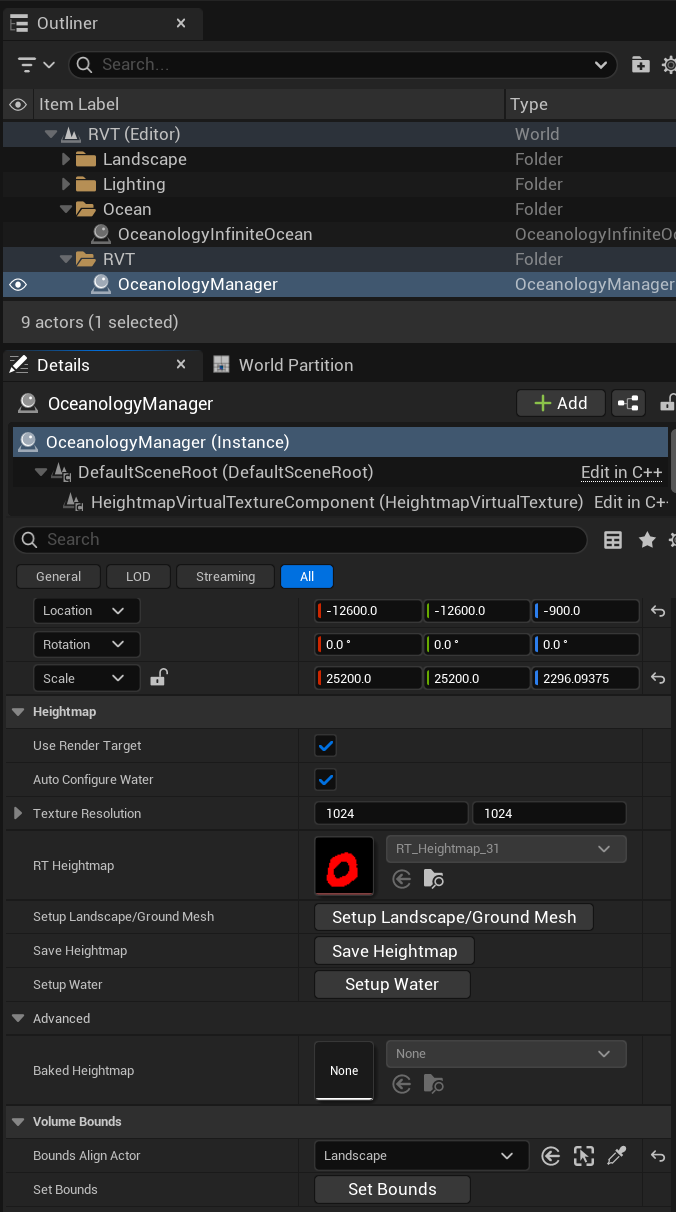
Select the OceanologyManager actor in the Outliner. In the Details panel, you will see the HeightmapVirtualTextureComponent as part of the actor hierarchy.
Expand the component and configure the Heightmap category:
Transform:
- Location - Position that covers your landscape. Example:
(-12600.0, -12600.0, -900.0) - Rotation -
(0.0, 0.0, 0.0) - Scale - Size of the heightmap coverage area. Example:
(25200.0, 25200.0, 2296.09375)- This should encompass your entire landscape.
Heightmap Settings:
| Property | Value | Explanation |
|---|---|---|
| Use Render Target | ✅ Enabled | Uses a render target for dynamic heightmap updates. Required for runtime terrain modifications. |
| Auto Configure Water | ✅ Enabled | Automatically configures the ocean to use this heightmap. Recommended for most setups. |
| Texture Resolution | 1024 × 1024 | Resolution of the heightmap texture. Higher values provide more detail but use more memory. 1024×1024 is a good balance. |
| RT Heightmap | RT_Heightmap_31 | The Render Target asset used for heightmap storage. Oceanology provides this asset. |
Action Buttons:
- Setup Landscape/Ground Mesh - Click to automatically configure your landscape to write to the RVT.
- Save Heightmap - Bakes the current heightmap to a static texture for improved performance.
- Setup Water - Configures the ocean to read from this heightmap.
Advanced:
| Property | Value | Explanation |
|---|---|---|
| Baked Heightmap | None | Optional pre-baked heightmap texture. Use for static landscapes to improve performance. |
Volume Bounds:
| Property | Value | Explanation |
|---|---|---|
| Bounds Align Actor | Landscape | The actor to align heightmap bounds to. Select your landscape for automatic sizing. |
| Set Bounds | Button | Click to automatically set bounds based on the selected Bounds Align Actor. |
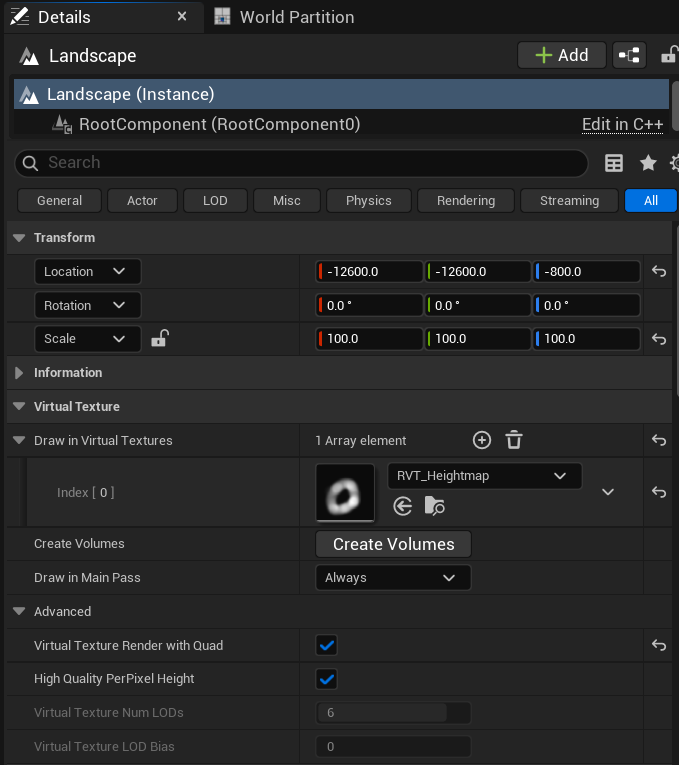
Select your Landscape actor in the Outliner. In the Details panel, configure the Virtual Texture category:
Transform:
- Location - Your landscape position. Example:
(-12600.0, -12600.0, -800.0) - Rotation -
(0.0, 0.0, 0.0) - Scale -
(100.0, 100.0, 100.0)(typical landscape scale)
Virtual Texture Settings:
| Property | Value | Explanation |
|---|---|---|
| Draw in Virtual Textures | 1 Array element | The list of RVTs this landscape writes to. |
| Index [0] | RVT_Heightmap | The Runtime Virtual Texture asset. Oceanology provides this asset - select it from the dropdown. |
| Create Volumes | Button | Creates the necessary RVT volumes in your level. Click this after assigning the RVT. |
| Draw in Main Pass | Always | Ensures the landscape renders in both the main pass and the virtual texture pass. |
Advanced:
| Property | Value | Explanation |
|---|---|---|
| Virtual Texture Render with Quad | ✅ Enabled | Optimizes RVT rendering using quad primitives. |
| High Quality PerPixel Height | ✅ Enabled | Enables high-precision height sampling for better foam accuracy. |
| Virtual Texture Num LODs | 6 | Number of LOD levels for the virtual texture. |
| Virtual Texture LOD Bias | 0 | LOD bias offset. Leave at 0 for default behavior. |
Important: After configuring these settings, click Create Volumes to generate the Runtime Virtual Texture Volume actor in your level.
Your landscape material must output its height data to the Runtime Virtual Texture. Oceanology provides a ready-to-use material called M_RVTLandscape.
Open M_RVTLandscape in the Material Editor. The key setup is:
Material Settings (Details Panel):
| Property | Value | Explanation |
|---|---|---|
| Material Domain | Surface | Standard surface material. |
| Blend Mode | Opaque | Solid, non-transparent surface. |
| Shading Model | Default Lit | Standard PBR lighting. |
| Two Sided | ❌ Disabled | Single-sided rendering for performance. |
| Is Thin Surface | ❌ Disabled | Standard surface thickness. |
| Use Material Attributes | ✅ Enabled | Enables material attribute passing. |
| Cast Ray Traced Shadows | ✅ Enabled | Allows ray-traced shadow casting. |
Material Graph - Get Heightmap Function:
The material contains a "Get Heightmap" Material Function that:
- Absolute World Position node - Gets the current pixel's world position.
- Component Mask (Z) - Extracts the Z (height) component.
- Runtime Virtual Texture Output - Writes the height to the RVT.
The Runtime Virtual Texture Output node has these connections:
- BaseColor - (optional) Landscape base color
- Specular - (optional) Specular value
- Roughness - (optional) Roughness value
- Normal - (optional) Normal map
- WorldHeight - Critical! Connect the Z component of Absolute World Position here
- Opacity - (optional) Opacity value
- Mask - (optional) Mask value
- Displacement - (optional) Displacement value
- Mask4 - (optional) Additional mask
The WorldHeight output is the essential connection - this is what the ocean reads to generate shoreline effects.

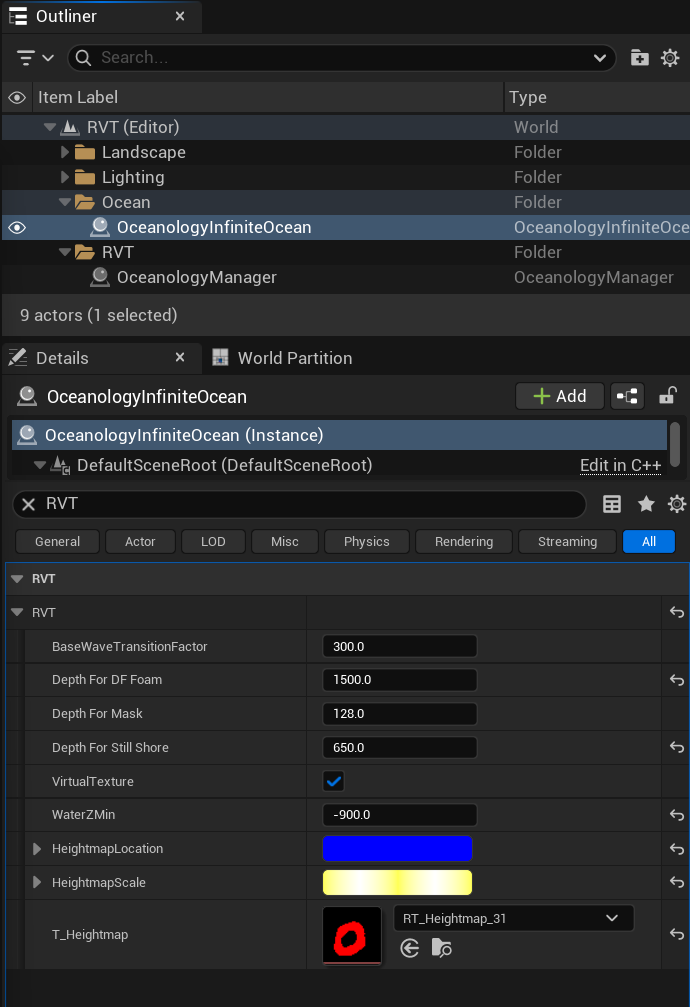
Select OceanologyInfiniteOcean (or your ocean actor) in the Outliner. In the Details panel, locate the RVT category:
Scene Hierarchy: Your Outliner should show:
- Landscape folder
- Lighting folder
- Ocean folder
- OceanologyInfiniteOcean
- RVT folder
- OceanologyManager
RVT Settings on OceanologyInfiniteOcean:
| Property | Default | Explanation |
|---|---|---|
| BaseWaveTransitionFactor | 300.0 | Distance over which waves transition near the shore. Higher values create smoother wave-to-shore transitions. |
| Depth For DF Foam | 1500.0 | Water depth at which Distance Field foam appears. Controls how far from shore the foam extends. |
| Depth For Mask | 128.0 | Depth threshold for the water mask effect. Affects transparency in shallow areas. |
| Depth For Still Shore | 650.0 | Depth below which the shore is considered "still" (minimal wave activity). Creates calm shallow water. |
| VirtualTexture | ✅ Enabled | Master toggle for RVT Heightmap. Must be enabled for all shoreline effects to work. |
| WaterZMin | -900.0 | Minimum Z height for water calculations. Should match or be below your lowest underwater terrain. |
Heightmap References:
| Property | Value | Explanation |
|---|---|---|
| HeightmapLocation | (Blue bar) | World location of the heightmap origin. Auto-configured when using Setup Water. |
| HeightmapScale | (Yellow bar) | Scale of the heightmap coverage. Auto-configured when using Setup Water. |
| T_Heightmap | RT_Heightmap_31 | Reference to the heightmap render target. Must match the RT Heightmap in Oceanology Manager. |
Tip: If you used Auto Configure Water in the Oceanology Manager (Note 2), these values should already be correctly set. If not, click Setup Water in the Oceanology Manager to configure them automatically.
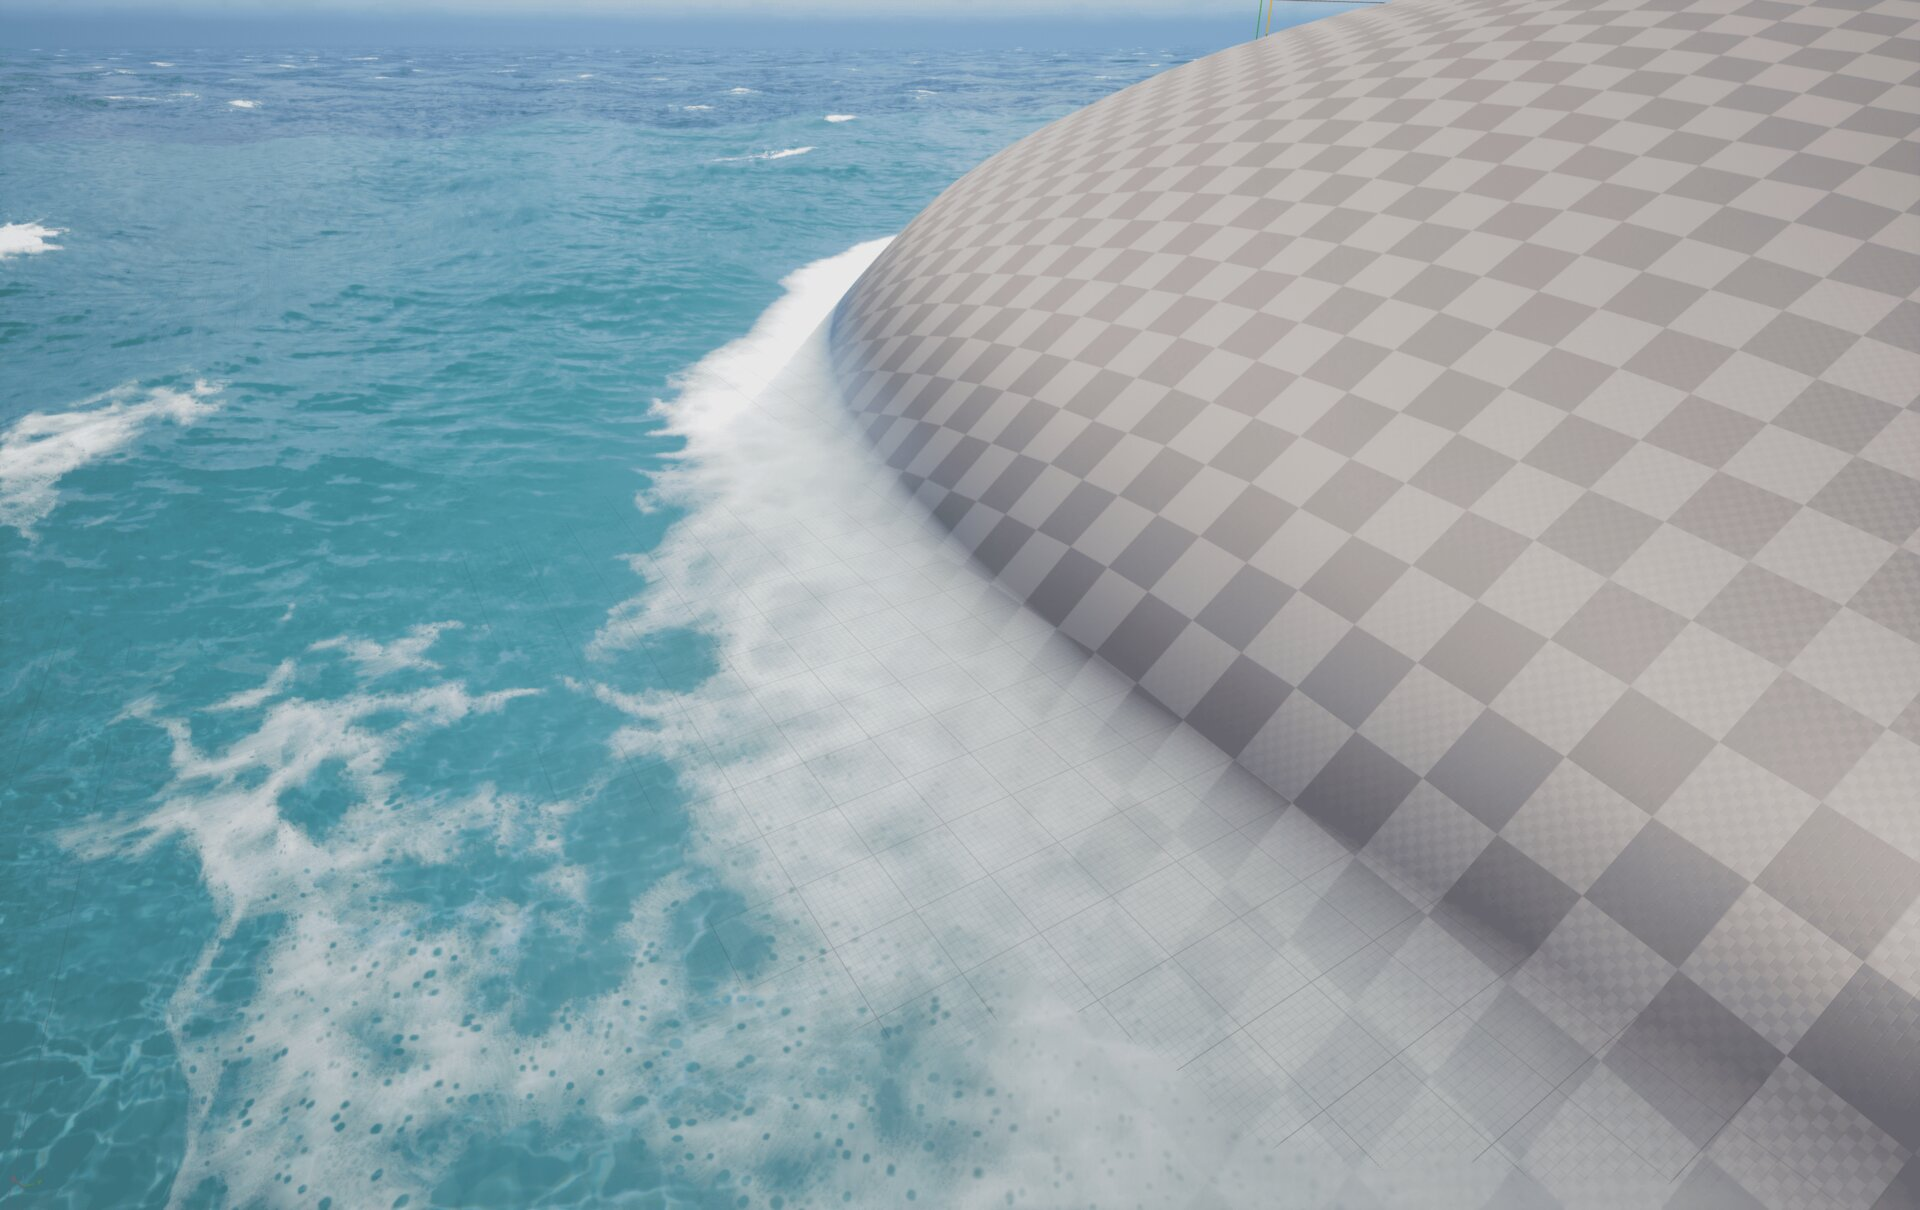
After completing the configuration, enter Play mode or use Simulate to see the RVT Heightmap in action.
You should see:
- White foam appearing where the ocean meets the landscape
- Smooth transitions from deep water to shallow areas
- Wave masking - waves naturally flatten as they approach the shore
- Depth-based effects - water clarity changes based on depth
The image shows a typical result: foam correctly appearing at the water-terrain intersection, creating a realistic shoreline effect.
If foam doesn't appear:
- Verify VirtualTexture is ✅ enabled on the ocean actor.
- Check that RVT_Heightmap is assigned to both the Landscape and Oceanology Manager.
- Ensure your landscape material outputs WorldHeight to the Runtime Virtual Texture Output.
- Click Setup Landscape/Ground Mesh and Setup Water in the Oceanology Manager.
Understanding the RVT Parameters
Depth Parameters Explained
The depth parameters control how different effects appear based on water depth:
Water Surface (Z = 0)
      │
      │ ◄─── Depth For Mask (128) ───── Transparency mask begins
      │
      │ ◄─── BaseWaveTransitionFactor (300) ───── Waves start transitioning
      │
      │ ◄─── Depth For Still Shore (650) ───── Shore becomes calm
      │
      │ ◄─── Depth For DF Foam (1500) ───── Maximum foam distance
      │
      ▼
Seabed (Landscape)
| Parameter | Effect | Increase Value | Decrease Value |
|---|---|---|---|
| BaseWaveTransitionFactor | Wave flattening distance | Smoother, gradual transitions | Sharper wave cutoff |
| Depth For DF Foam | Foam coverage area | More foam, extends further from shore | Less foam, closer to waterline |
| Depth For Mask | Transparency mask range | Larger shallow clear area | Smaller clear area |
| Depth For Still Shore | Calm water zone | Larger calm area near shore | Smaller calm zone |
Visual Quality vs. Performance
| Setting | Higher Value | Lower Value |
|---|---|---|
| Texture Resolution (1024) | More precise foam edges | Better performance, softer edges |
| Virtual Texture Num LODs (6) | Better distance quality | Faster streaming |
| High Quality PerPixel Height | Accurate foam placement | Faster rendering |
Troubleshooting Common Issues
| Problem | Likely Cause | Solution |
|---|---|---|
| No foam appears | VirtualTexture disabled | Enable VirtualTexture on ocean actor |
| Foam everywhere | Heightmap not configured | Click Setup Landscape/Ground Mesh in Manager |
| Foam at wrong height | WaterZMin incorrect | Adjust WaterZMin to match terrain lowest point |
| Foam too far from shore | Depth For DF Foam too high | Reduce Depth For DF Foam value |
| No foam in some areas | Landscape missing RVT output | Apply M_RVTLandscape or configure material |
| Flickering foam | LOD issues | Increase Virtual Texture Num LODs |
| Performance issues | Resolution too high | Reduce Texture Resolution to 512×512 |
| Foam not matching terrain | Bounds mismatch | Click Set Bounds in Oceanology Manager |
Quick Setup Checklist
Use this checklist for rapid RVT Heightmap setup:
Oceanology Manager:
- Added to level
- Heightmap component configured
- Texture Resolution set (1024×1024 recommended)
- Bounds Align Actor set to Landscape
- Clicked "Set Bounds"
- Clicked "Setup Landscape/Ground Mesh"
- Clicked "Setup Water"
Landscape:
- RVT_Heightmap assigned in Draw in Virtual Textures
- Clicked "Create Volumes"
- Draw in Main Pass = Always
- Virtual Texture Render with Quad = ✅
- High Quality PerPixel Height = ✅
Landscape Material:
- Using M_RVTLandscape OR
- Custom material with Runtime Virtual Texture Output
- WorldHeight connected to Absolute World Position Z
Ocean (OceanologyInfiniteOcean):
- VirtualTexture = ✅ Enabled
- T_Heightmap assigned (RT_Heightmap_31)
- WaterZMin matches terrain lowest point
- Depth parameters tuned for your scene
Summary
In this guide, you learned how to:
- Understand RVT Heightmap - How the ocean reads terrain height for shoreline effects.
- Add Oceanology actors - Set up the Manager and Ocean in your scene.
- Configure Oceanology Manager - Set up the heightmap component with proper bounds and resolution.
- Configure the Landscape - Enable RVT output and assign the heightmap texture.
- Set up the landscape material - Ensure WorldHeight is output to the Runtime Virtual Texture.
- Configure the ocean RVT settings - Enable VirtualTexture and tune depth parameters.
- Verify the result - Confirm shoreline foam appears correctly.
RVT Heightmap is essential for creating realistic coastal environments. The system is highly performant and works with any terrain shape, making it ideal for open-world games with complex coastlines.
Quick Reference
| Parameter | Location | Default | Purpose |
|---|---|---|---|
| Texture Resolution | Oceanology Manager | 1024×1024 | Heightmap detail level |
| Use Render Target | Oceanology Manager | ✅ | Dynamic heightmap updates |
| Auto Configure Water | Oceanology Manager | ✅ | Automatic ocean setup |
| RVT_Heightmap | Landscape | Asset | Virtual texture reference |
| Draw in Main Pass | Landscape | Always | Render in both passes |
| VirtualTexture | Ocean | ✅ | Master RVT toggle |
| BaseWaveTransitionFactor | Ocean | 300.0 | Wave transition distance |
| Depth For DF Foam | Ocean | 1500.0 | Foam coverage depth |
| Depth For Mask | Ocean | 128.0 | Transparency mask depth |
| Depth For Still Shore | Ocean | 650.0 | Calm water zone depth |
| WaterZMin | Ocean | -900.0 | Minimum water height |
End of RVT Heightmap Guide