Riverology - Setup
Get Riverology up and running in your Unreal Engine project with this comprehensive setup guide.
Prerequisites
| Requirement | Details |
|---|---|
| Unreal Engine | UE5.x (latest release) |
| Operating System | Windows with DirectX 12 capable GPU (GTX 1080 / RTX 3060+) |
| Shader Model | SM6 support recommended |
| Optional | Mesh Distance Fields for shoreline effects |
Use spline points to shape your river. Adjust flow, width, and foam per-segment for varied river characteristics.
Installation Steps
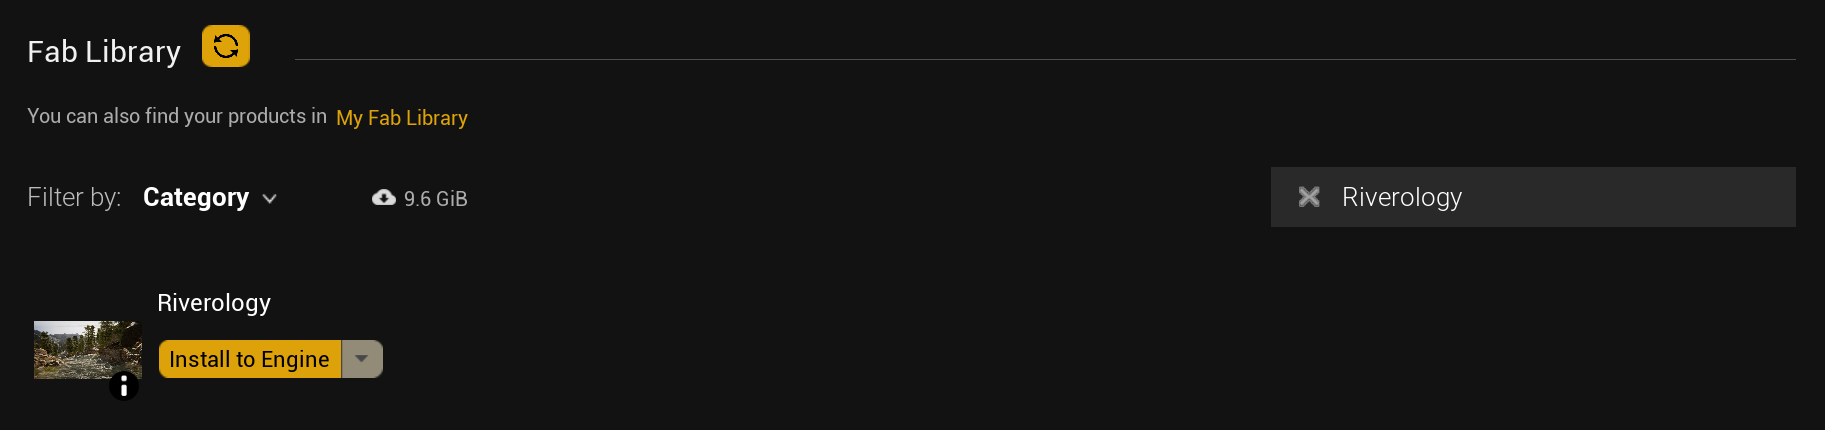
Step 1: Find the Plugin in FAB Library
Open the Epic Games Launcher and navigate to the Fab Library. Search for Riverology to locate the plugin. You will see Riverology with the "Install to Engine" button.
Step 2: Install to Your Engine Version
Click the dropdown arrow (▼) next to "Install to Engine" and select your target engine version. In the "Install Plugin" dialog, verify the "Slot to add plugin to" matches the UE version your project uses (e.g., 5.6), then click Install (or Resume if a previous download was interrupted).
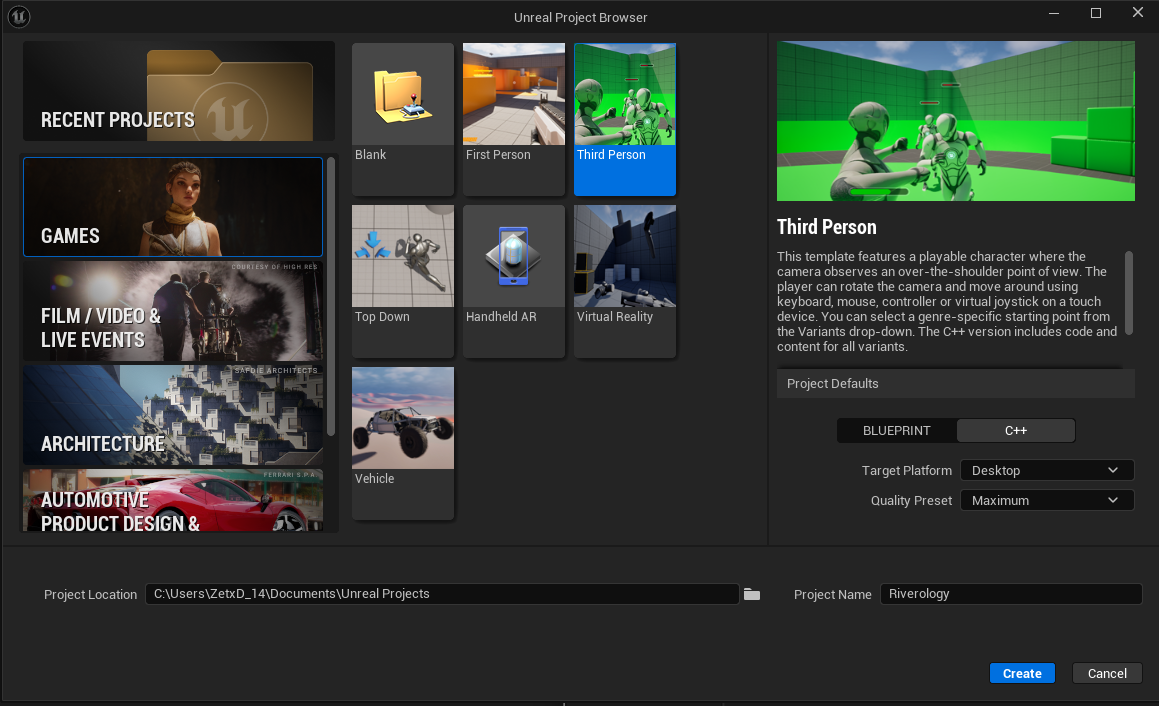
If you prefer manual installation, select "Create Project" from the dropdown instead — this downloads the plugin into a new UE project. Then copy the Plugins/Riverology folder into your own project's Plugins/ directory.

Step 3: Open or Create Your Project
Launch Unreal Engine and open an existing project or create a new one. If you installed the plugin to the engine, it will be available automatically once the editor loads.
If you manually copied the plugin files into your project's Plugins/ folder, the editor will detect them on startup.
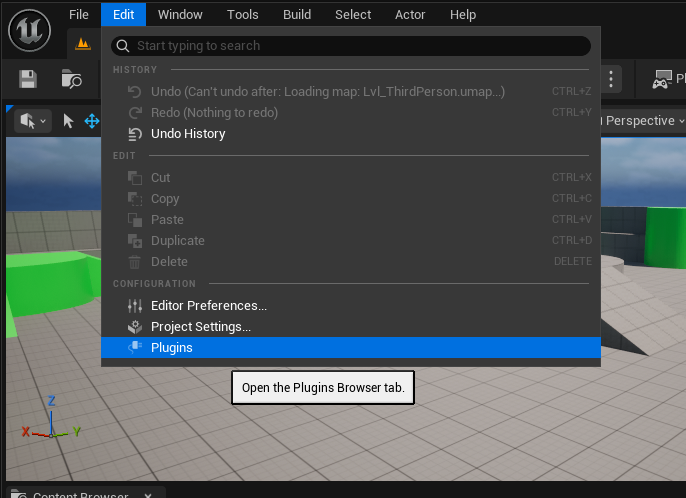
Step 4: Open the Plugins Window
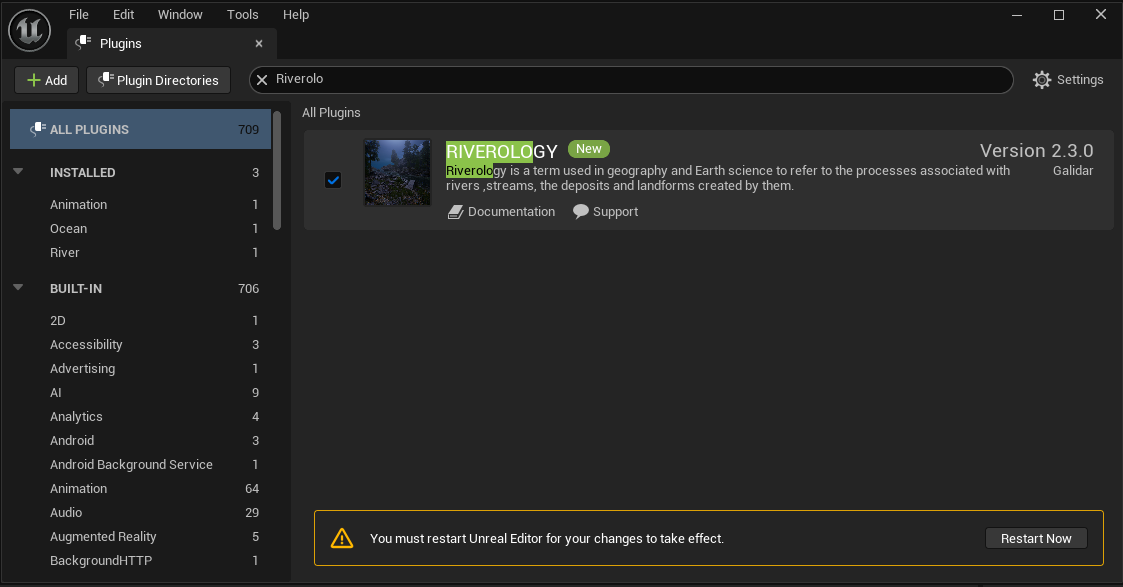
Once your project is loaded, go to Edit → Plugins to open the Plugins Browser. This is where you can search for and enable Riverology.
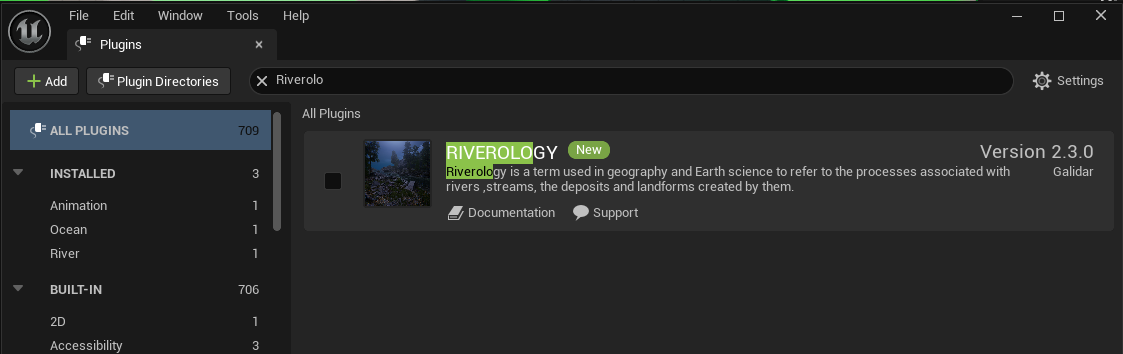
Step 5: Find the Plugin
In the Plugins window, type "Riverolo" in the search bar. You will see RIVEROLOGY listed under the Installed section. Verify the version number and publisher (Galidar).
Step 6: Enable and Restart
Check the enable checkbox next to RIVEROLOGY. A yellow banner will appear at the bottom: "You must restart Unreal Editor for your changes to take effect." Click Restart Now to apply the changes.
After restart, confirm no missing dependencies in the Output Log.
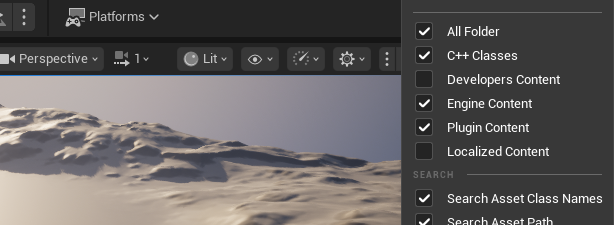
Step 7: Show Plugin Content in Content Browser
To access the plugin's demo maps and assets, you need to make plugin content visible:
- Open the Content Browser (or Content Drawer)
- Click the Settings/Filter icon (⚙️) in the top-right area
- Enable Plugin Content so that plugin assets appear in the browser
This allows you to browse the Riverology assets, maps, and presets.
Step 8: Browse Plugin Content
With plugin content visible, navigate to All → Engine → Plugins → RIVEROLOGY in the Content Browser tree. You will see the plugin's folder structure including:
- Characters — Character-related assets
- Input — Input mapping assets
- Level Prototyping — Prototyping assets
- ThirdPerson — Third-person template assets
- Variant_Combat — Combat variant maps
- Variant_Platforming — Platforming variant maps
- Variant_Side Scrolling — Side-scrolling variant maps
Open a map from one of the variant folders to verify everything works correctly.

Post-Installation Configuration
Configure Project Settings
Navigate to Edit → Project Settings and configure the following for optimal results:
Required Settings
| Category | Setting | Value |
|---|---|---|
| Platforms → Windows | Default RHI | DirectX 12 |
| Platforms → Windows | D3D12 Shader Model 6 | ✅ Enabled |
| Engine → Rendering | Generate Mesh Distance Fields | ✅ Enabled |
Recommended Settings
| Category | Setting | Value |
|---|---|---|
| Engine → Rendering | Global Illumination | Lumen |
| Engine → Rendering | Reflections | Lumen |
| Engine → Rendering | Shadow Map Method | Virtual Shadow Maps |
Place the River Spline
Add a river to your own level:
- Open Place Actors panel
- Search for Riverology Spline
- Drag it into your level
- Click to add spline points and shape your river
For expansive maps, use World Partition for optimal streaming performance.
Test Your Setup
- Save your level (Ctrl+S)
- Click Play In Editor
- Verify the river renders correctly
- Test flow direction and water effects
Troubleshooting
FAB Marketplace / Installation Issues
If FAB shows the plugin as "Already Installed" but it was never downloaded, or clicking "Install to Engine" does nothing:
-
Clear the FAB / Launcher cache:
- Close the Epic Games Launcher completely
- Navigate to
C:\Users\<YourUser>\AppData\Local\EpicGamesLauncher\Saved\and delete the webcache folder - Reopen the Launcher and try installing again
-
Verify the correct Engine version:
- In the Fab Library, locate Riverology and click the dropdown arrow (▼) next to "Install to Engine"
- In the "Install Plugin" dialog, check the "Slot to add plugin to" dropdown — make sure it matches the UE version your project uses (e.g., 5.6)
- If you have multiple engine versions installed, FAB may have associated the plugin with a different one
-
Manual installation as fallback:
- In the Fab Library, click the dropdown arrow (▼) next to "Install to Engine" and select "Create Project"
- This downloads the plugin into a new UE project — then copy the
Plugins/Riverologyfolder into your own project'sPlugins/directory - You can also find your products in My Fab Library on the web
-
Check disk space and permissions:
- Ensure you have sufficient disk space on the drive where UE is installed
- Run the Epic Games Launcher as Administrator if install buttons are unresponsive
If none of the above steps resolve the issue, open a support ticket on our Discord with:
- A screenshot of what FAB shows (the "Already Installed" message)
- Your Unreal Engine version
- Your Order ID from Epic Transactions
We'll help you get up and running.
Common Issues
Pink/Preview Materials Shaders are still compiling. Wait for compilation to complete.
No Shoreline Foam Enable Generate Mesh Distance Fields in Project Settings.
DX12/SM6 Errors Verify Project Settings and restart the editor.
Low Performance
- Disable debug views
- Reduce complexity settings
- Profile GPU with
stat gpu
Next Steps
| Guide | Learn About |
|---|---|
| Buoyancy | Add floating objects with flow forces |
| Swimming | Implement character swimming |
| Surface | Configure water rendering |
| Foam | Set up dynamic foam effects |